Food Challenge: Eliminate Waste
Published: March 29, 2018
National Nutrition Month® is a nutrition education and information campaign created annually in March by the Academy of Nutrition and Dietetics. In honor of National Nutrition Month, we challenged our faculty, students, and staff to a series of food challenges.
"Go Further with Food" is the theme for 2018, so for our third challenge we asked participants to reduce waste by starting a compost pit with any biodegradable food scraps. We also asked them to recycle paper and plastic by using reusable kitchenware and canvas grocery bags.
Center staff members, Amanda Reat and Rachel Linton, took on the “Eliminate Waste” challenge and shared their experiences on reusable kitchenware and composting:
Amanda Reat
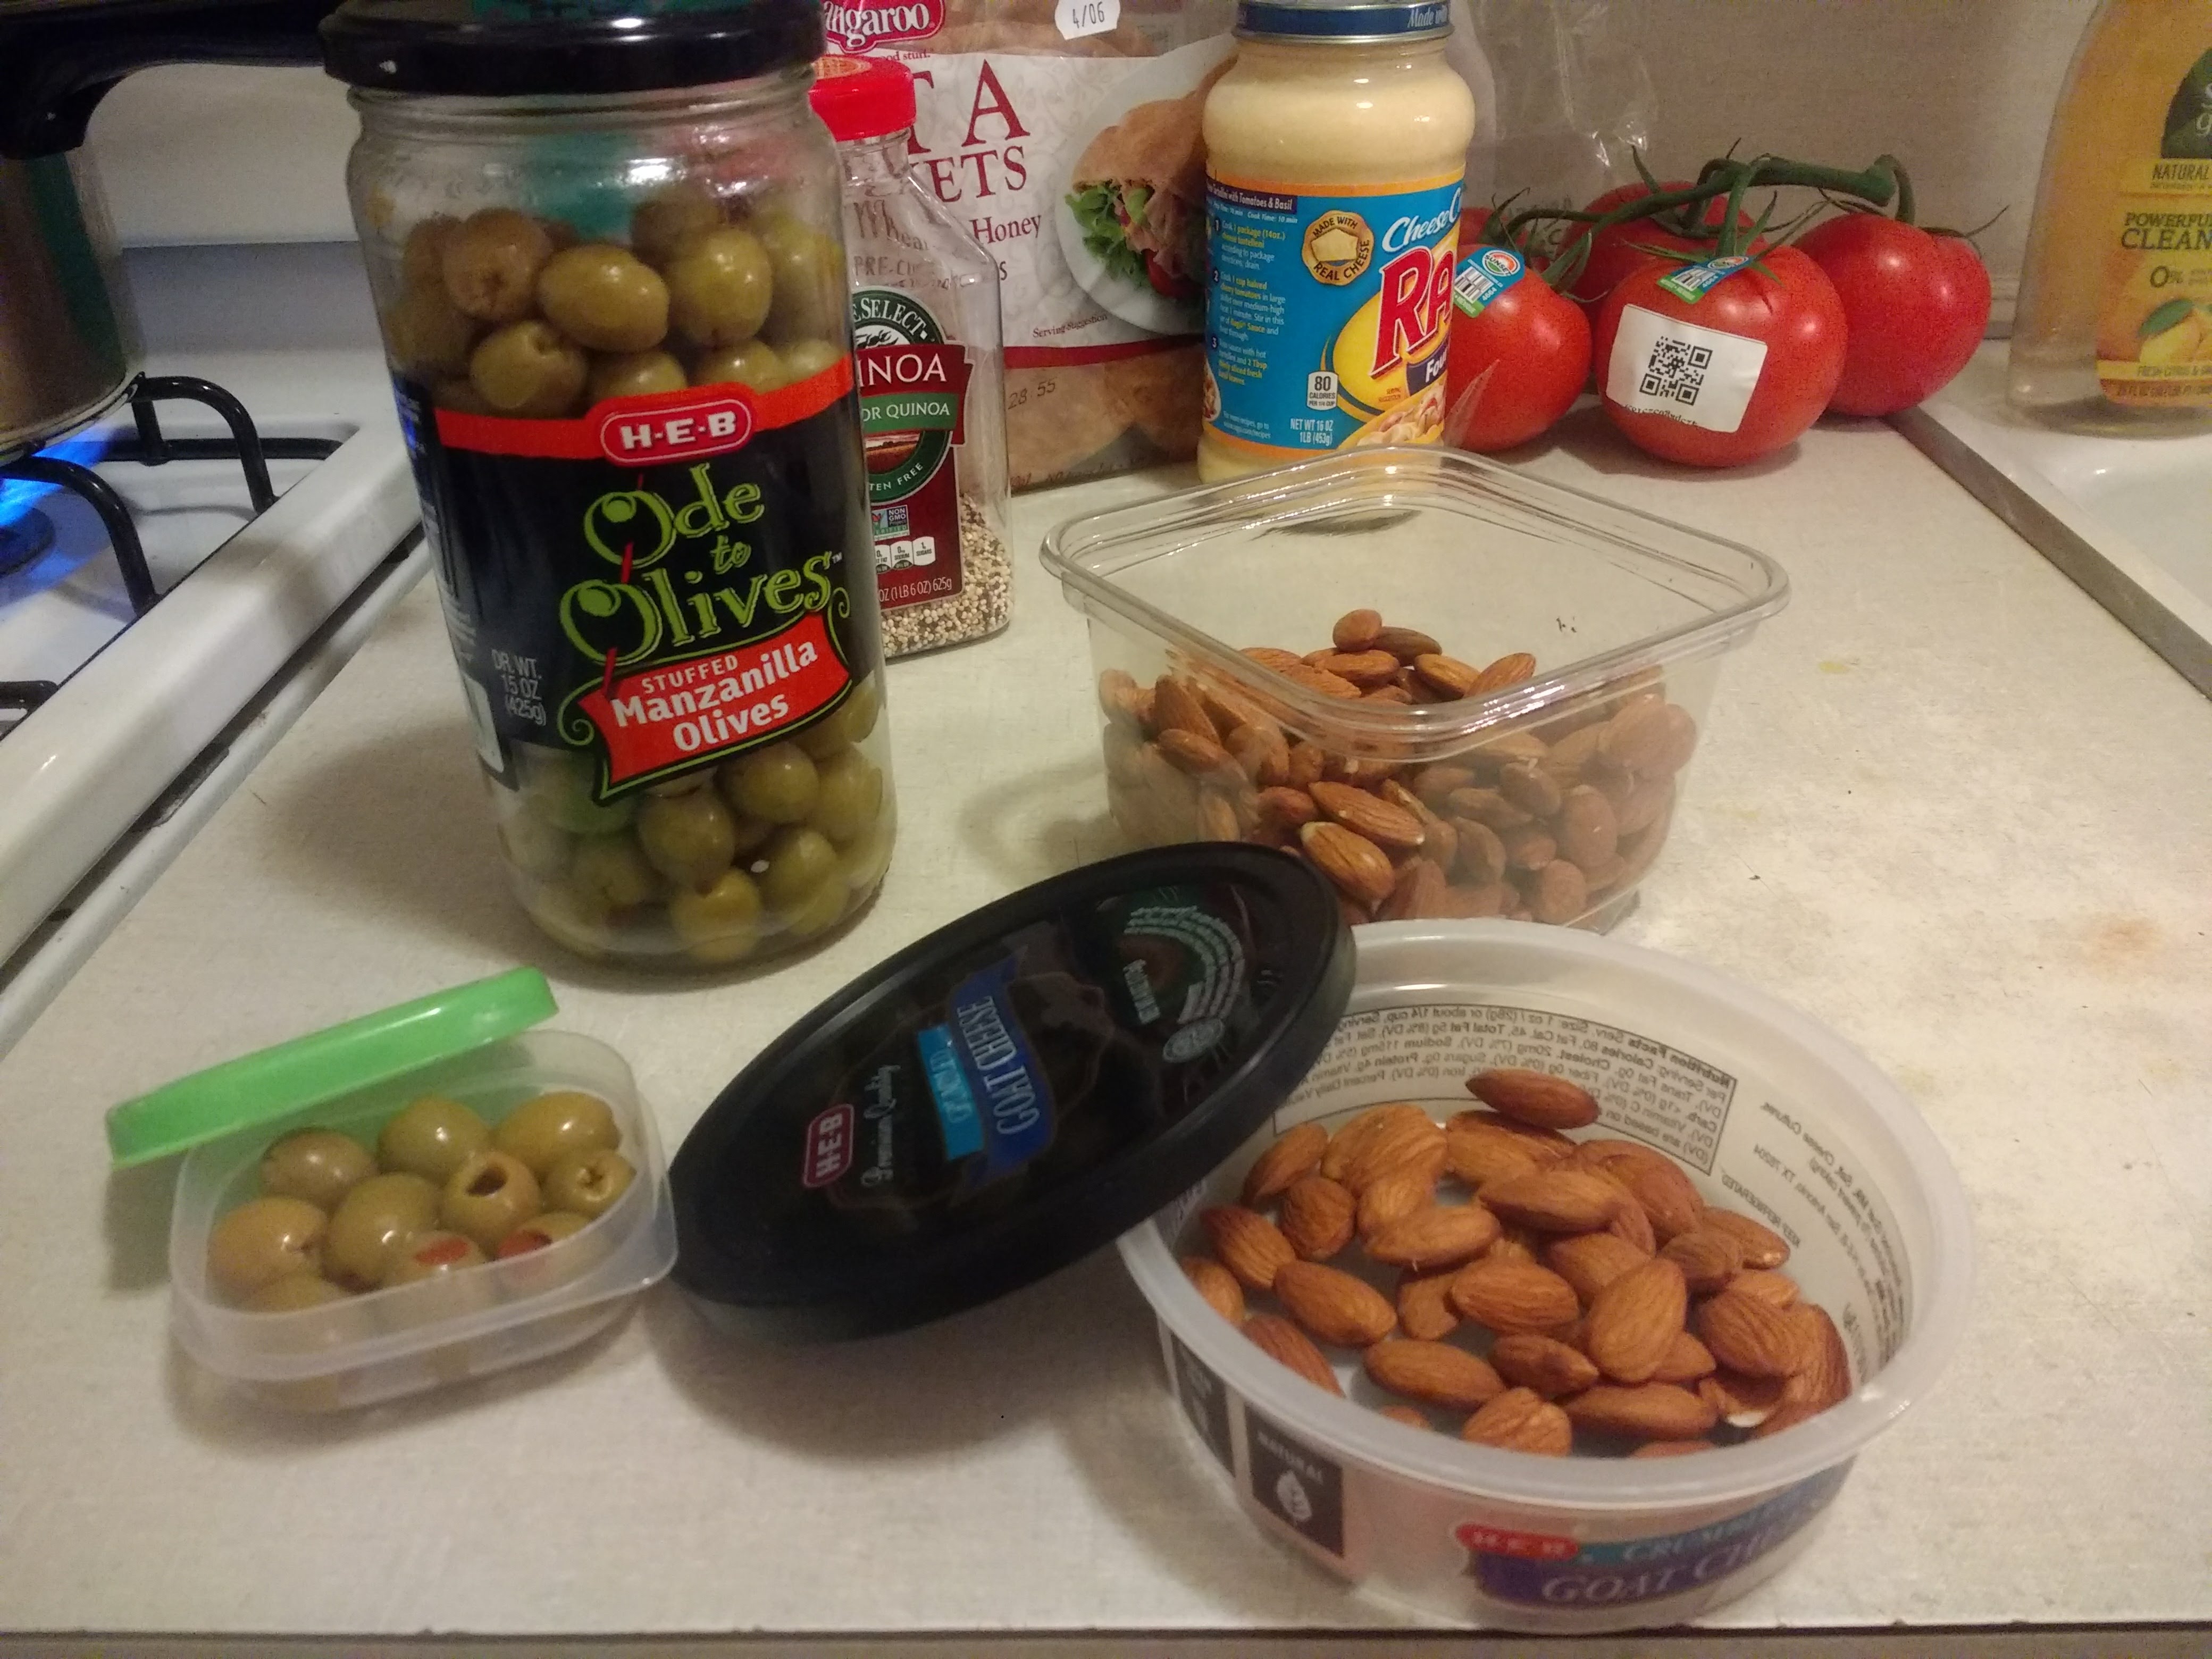
I’m a big fan of snacking so I love reusing the little HEB Goat Cheese containers for my snacks like almonds and olives. I’m also a big fan of reusable bento-style lunch boxes because I can put lots of different food items in there and reuse them throughout the week.
I also rescued a glass container from clean-out-the-refrigerator day at work. It was a moldy mess destined for the trashcan but I rescued, cleaned it, and put my lunch in it.
Rachel Linton
Steps for starting your own home compost pile:
Identify a space to store your pile. It needs to be about 3x3 sq. ft. Choose an area that is well ventilated and not where rainwater is prone to collecting. It should not be super close to your house but it should be convenient enough for you to access often with enough space to walk around it. Putting it near the garden or flowerbeds is a good idea too for easier transfer when it is ready to use.
Decide whether you’d like to use a bin or leave the pile open. You can always start with an open pile and get a bin later, but there are several advantages to using a bin. These include protection from rodents and other critters, ease of turning the pile, and ease of emptying the finished compost once the starting materials have decomposed. You also have to water and turn it less often with a bin. If you can invest about $30-$50 in a good bin, then it is worth it and will save you money in the long run from not having to buy garden soil.
Assemble your Compost Ingredients:
- Brown Stuff - this includes things like dried leaves, straw, dead yard trimmings, small twigs, and shredded newspaper.
- Green Stuff - this includes any fresh yard clippings & weeds that are still green and animal manure from herbivore animals such as cows or horses. ***Do not include manure from carnivores such as dogs and cats in your compost pile.
- Kitchen Stuff – this includes fruit and vegetable scraps (take off the produce stickers), eggshells, coffee grounds, tealeaves and other organic material that comes from the kitchen. ***Do not include meat, fish, bones, grease, or dairy products in your compost pile. A home compost pile does not get hot enough for these items to decompose properly. You may want to buy a countertop compost bin with a lid and carbon filter to store compost in the kitchen while you cook. After every time you cook, you can empty it in your main pile. These are about a $12-$25 investment and worth every penny to keep the odor down and for the convenience!
- Water – compost needs to be kept moist in order to properly decompose. You want to water the pile about once a week if it is open and once a month if it’s in a bin. Water more during the hotter, drier months, and less in the winter.
- Air – the compost pile needs to be turned periodically to mix the ingredients and ensure even decomposition throughout. Many compost bins are designed with handles that allow you to easily mix the ingredients inside or in a barrel that can be rolled around. This should be done about once a month if the ingredients have been evenly layered. An open pile will need to be turned with a rake or shovel about every 2 weeks.
- Garden soil – to get your pile started, you need to add a few shovels full of garden soil into the mix. You can also use finished compost instead of garden soil to do this. It’s a good idea to add soil periodically as well.
Start your pile – the ratio of ingredients should be three parts brown stuff to one part green & kitchen stuff combined with a bit of soil. When you first begin your pile, put a thick layer of leaves and other “brown” ingredients on the bottom, then add your one part green and kitchen ingredients and a bit of soil and then continue layering until you have a pile that is about 3 ft. high or fills the bottom third of your bin. Water the pile and wait a couple of weeks to do the first turn. Keep layering the ingredients as you go and your pile will gradually become larger and smaller at the same time as it decomposes. It’s a good idea to store a pile of raked leaves and other “brown” ingredients near your pile or bin and then every time you add a bucket of kitchen items, you can refill it 3 times with brown ingredients and add them to the pile on top.
Maintenance – keep adding ingredients as they become available and monitoring your pile’s status. If you see earthworms and rich, brown/black dirt in the center, that is good – keep doing what you are doing! If you see lots of roaches and attract rodents like mice, that is bad – add fewer kitchen scraps and more brown & green stuff! If your pile is warm and sometimes emits steam when you turn it, that’s good! The bacteria are doing their jobs and you are witnessing the science of decomposition. If your pile seems dry and nothing is really happening, try adding more water. You may be turning it too often or not often enough. You will get a feel for it after the first few months.
Harvesting – once a good portion of your pile has turned into finished compost, you can take it out and use it on your garden to grow wonderful fruits and vegetables and continue the beautiful cycle of life! Depending on how your bin is designed, you may be able to lift off the bin and harvest the bottom layers of the pile or take the top layers off and set them aside to harvest the bottom one. If you have an open pile, the compost in the middle is usually more finished than the edges. You may also opt to sift your compost through a coarse mesh screen to avoid getting large bits of leaves and twigs that should not be used in your garden. Good things come to those who wait, so be patient – making good compost takes time!
Enjoy! You are doing the planet good by helping reduce waste that goes to landfills and also saving yourself money by making your own home composting pile! Use it on your garden, your lawn, and/or your flowerbeds to get everything growing.
See more information on composting at home below:
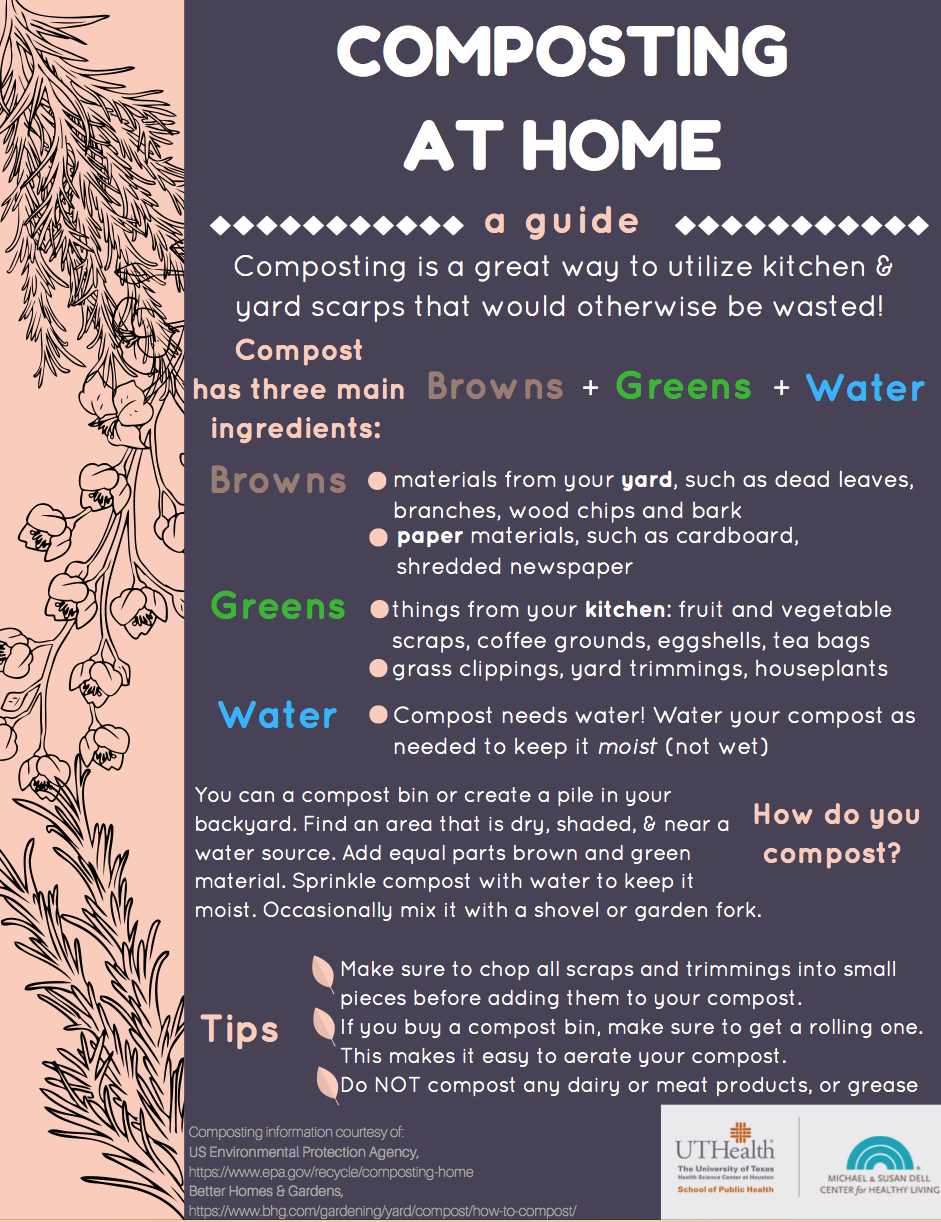
- Enriches soil, helps retain moisture and suppresses plant diseases and pests.
- Reduces the need for chemical fertilizers.
- Encourages the production of beneficial bacteria and fungi that break down organic matter to create humus, a rich nutrient-filled material.
- Reduces methane emissions from landfills and lowers your carbon footprint.
Collect these materials to start off your compost pile right:
- Fruit scraps
- Vegetable scraps
- Coffee grounds
- Eggshells
- Grass and plant clippings
- Dry leaves
Eliminating waste is something we should all try to achieve. You don’t realize how much food and plastic you’re wasting until you try to reduce it. Our challengers learned a lot about how they could reduce waste and have created new habits. We encourage everyone to take on this challenge and start eliminating the amount of your waste!
Check out our first challenge blog here: Food Challenge: Re-Use and Store
Check out our second challenge blog here: Food Challenge: Meal Prepping

Discussion